Showing posts with label Noodles N Such Recipes. Show all posts

Monday, September 30, 2013

Cold Spicy Soba Noodles

A few weeks ago, the husband and I invited some of our neighbors over for some BBQ potluck. We bought some delicious pre-marinated ribs from Costco (the ribs were a big hit!!), made some vegetable skewers and provided a variety of drinks for our neighbors. Each neighbor brought different yummy dishes to share. One of my neighbor made some Sichuan "Liang Mian" (Cold Noodles) over and everyone agreed it was delicious. The noodles were simple and very refreshing, with a bit of kick from the chili. I've never had this before and even though I'm not a bit fan of Sichuan food (they tend to be too spicy for me), I liked this one and didn't feel the spiciness as much. I guess my neighbor had probably tone the spice level down a little.

After a weekend of eating out, I crave for a simple lunch. Working with the ingredients in my pantry, I decided to make my version of the Sichuan "Liang Mian". I have a few different types of noodles in my pantry, but decided to use Soba noodles instead. It turned out pretty yummy, and definitely refreshing. I will definitely make this again. Here's the recipe.


COLD SPICY SOBA NOODLES RECIPE
*Serves 2-3

Ingredients

  • 2 Bundle Soba Noodles
  • 1 Tbsp (Low Sodium) Soy Sauce
  • 1 Tbsp (Lee Kum Kee) Chili Bean Sauce
  • 1 Tbsp (Chin Kiang) Black Vinegar
  • 1 Tbsp Sesame Oil
  • 2 Tsp Sweet Soy Sauce (Kicap Manis)
  • 1 Stalk Green Onion, Chopped
  • 1 Handful Cilantro, Chopped
  • 1/2  Tbsp Raw Skinless Peanuts
  • 1/2 Tsp Toasted Sesame Seeds
Method

Cook the soba noodles per the instruction on the package. Once noodles are cooked, run cold water through the noodle to stop the cooking and to cool down the noodle. Drain and set cooled noodles aside. 

In a pan, dry roast (no oil needed) the peanuts over medium heat until golden brown. Stir peanuts occasionally so that they so not burn. Once peanuts are toasted, set aside, let cool and give them a rough chop. Mix all the liquid ingredients in a bowl to make the sauce and set aside. 

Divide the noodles into 2-3 bowls. Drizzle the sauce onto the noodles. Sprinkle each bowl with the green onion, cilantro, chopped peanuts and sesame seeds. Serve immediately. Enjoy!


June's notes:  Like me, you can definitely use any noodles of your choice. I think even linguini or ramen noodles will work fine! =) 

Simply June 

Thursday, August 9, 2012

Hainanese Chicken Rice

Updated December 14, 2013


Hainanese Chicken Rice is one of the best Malaysian comfort food, and most ingredients are easily obtainable in the US. Hainanese Chicken Rice is very popular in Malaysian and Singapore and it is usually served with some cucumber, soy sauce, chili sauce and complimentary soup. To make it your own, it's pretty easy although there are many optional parts to make up the delicious comfort food.

Since the husband chose to have Hainanese Chicken Rice for dinner 2 days ago, I've decided it's the perfect time to note down the ingredients, method and all of how I make my Hainanese Chicken Rice.  I usually like to use chicken thigh instead of whole chicken, but in this recipe I'll be using chicken legs (thigh + drumsticks) as that was what I had in the freezer. I usually make the fragrant/flavored rice in a rice cooker, so if you do not have one.. it's ok.. you'll just need to adjust your cooking method a little. I don't have the instructions for cooking rice in a regular pot, as I'm pretty bad at it. =( I believe there are 2 ways to prepare the chicken; by steaming it or by boiling it. I've always cooked mine the latter.

I make chicken rice (via boiling method) very often but I've never written down the recipe and exact measurements. However, due to some requests for the recipe lately, I know that I needed to put everything down on paper...and after posting a picture of the HCR on Facebook and getting an overwhelming response of "likes" and comments, I was glad I took the time to write the ingredients and steps on paper that day. My friends have requested for the recipe and I have to say I had a success story when my friend was very thrilled with the way her HCR turned out based on my over the Facebook rough instructions. I can't take all the credit as she did the cooking and made the adjustments... I just told her what to do and what to use!

The Hainanese Chicken Rice in Malaysia does not come with the ginger garlic/scallion sauce.  I first fell in love with this sauce when I ate a steamed chicken from a Chinese restaurant in Chicago. This sauce is quite commonly served with steamed chicken in Asian restaurants. So, I now always make this dipping sauce every time I make Hainanese Chicken Rice and the husband loves it! For a guy who likes spicy food, he prefers the ginger garlic sauce over chili sauce when he eats his chicken rice. As for the chili dipping sauce, I've always just gotten them from the store; most bottled chili sauce (typically from Indonesia/Malaysia or Thailand) works for me.

Here's the lengthy instruction to make some Hainanese Chicken Rice. The list will look tremendously long and tedious, but it's really not that bad...and will be oh-so-worth it once you sit down and enjoy your meal. Here's the recipe!


HAINANESE CHICKEN RICE RECIPE
*Serves 3-4

Part (A) - Hainanese Chicken 
Ingredients
  • 6-8 Chicken Thighs
  • 2-3 Inch Ginger, Sliced
  • 10 Cup Water
  • 1-1/2 Tsp Salt
  • Ice Water Bath
Method
In a large pot, let 10 cups of water and ginger come to a boil over medium high heat. Trim the chicken to remove access chicken fat and skin. Gently score the meat closest to the bone to slightly detach it to ensure shorter cooking time. Do not completely remove the bone.

Once water is boiling slowly add chicken thighs and salt. Make sure water covers the chicken, if not add a little more water. Let the chicken boil for about 15 minutes over medium high heat. Using a ladle, gently remove as much of the "white foamy scum" and as much fat from the soup. Then, reduce heat to medium low and let chicken legs simmer for about 20-25 minutes or until chicken legs are cooked. To test wether the chicken is cooked, careful remove a piece of chicken, and poke the chicken (nearest to the bone). If the liquid runs clear, that means the chicken is cooked. If pink juice flows out, continue cooking for a few more minutes.

Once cooked, remove from heat and place immediately in a ice water bath for about 5-10 minutes. Then, remove from ice water bath, let it drain, slice chicken thighs (bone in or out) and set aside.

Do not discard the chicken broth from boiling the chicken as it will be used multiple times throughout the recipe.

Part (B) - (Chicken) Flavored Rice
Ingredients
  • 10 Cloves Garlic, Chopped (About 3 Tbsp)
  • 1 Tbsp Sesame Oil
  • 1 Tbsp Vegetable Oil
  • 2 Cups Uncooked Jasmine Rice, Washed
  • 2 Inch Ginger, Sliced
  • Chicken Broth (from Part A) sufficient to cook your rice.
  • 2-3 Pandan Leaves, Knotted
  • Pinch of Salt
Method
In a frying pan, heat 1 Tbsp of Sesame Oil and 1 Tbsp of Vegetable Oil over medium heat. Add chopped garlic and sauté until garlic is golden brown. Remove fried garlic and set aside. Do not wash frying pan. 

Over medium high heat, add 2 tbsp of the fried garlic (and some garlic oil) into the same frying pan. Add sliced ginger and rice and stir fry the rice for about 5 minutes. Transfer "fried" rice into a rice cooker and add leftover chicken broth from Part A. Add pandan leaves, a pinch (or two) of salt, and turn on the rice cooker and let it work its magic. 

The remainder of the fried garlic (and oil) will be used in Part C for the Soy Dipping Sauce to go with the chicken rice.

June's Comments: Add sufficient liquid to the rice, as how you would usually cook plain rice. Don't make the rice too al dente, though. It needs to be soft, fluffy and fragrant. I've been using the pressure cooker to make my rice, and do not use as much liquid. Adding the extra chicken fat and skin from the broth when cooking the rice makes it extra fragrant!

Part (C) - Soy Dipping Sauce (for rice and chicken)
Ingredients
  • Fried Garlic + oil from (Part B)
  • 2 Tbsp Dark Sweet Soy Sauce
  • 3 Tbsp Light Soy Sauce 
  • 1 Tbsp Oyster Sauce
  • 4 - 6 Tbsp Chicken Broth (from Part A)
Method
Mix all ingredients listed above in a bowl and set aside till serving time. 

Part (D) - Ginger Garlic Dipping Sauce
Ingredients
  • 8-10 Garlic Cloves, Finely Minced (About 3 Tbsp)
  • 2 Stalk Green Onions/Scallion, Finely Chopped (About 3 Tbsp)
  • 2 Inch Ginger, Peeled & Finely Minced (About 3 Tbsp)
  • 8 Tbsp Vegetable Oil
  • 1-1/2 Tsp Salt
Method
Mix all ingredients listed above in a bowl and set aside till serving time.

June's Comments: Must use fresh garlic. Do not use pre minced ones from the store. 

Part (E) - Optional Soup
Ingredients
  • Remaining chicken broth from Part (A)
  • 8-10 Fish Balls
  • Dash of pepper
  • 1 Stalk Green Onion/Scallion, Chopped
  • Salt to tast
Method
Heat remaining chicken broth from Part A over medium high heat. Add fish balls and let them cook until they are "floating" and slightly "bloated". Season with pepper and salt if needed and garnish with chopped green onion before serving.

TO SERVE
Ahh... finally the serving and eating part. Community style would be easiest, that way everyone can take as much as they want. Drizzle some soy dipping sauce over the chicken thigh platter and serve with some sliced cucumbers. Serve rice warm, don't forget to bring out the tasty dipping sauces and simple soup! Enjoy!

*Sorry for the crappy picture. This was an older picture taken with my phone.

Simply June 

Thursday, August 2, 2012

Egg & Chinese Sausage Fried Rice

Fried Rice is often associated with Chinese. The husband and I often joked that whenever we travel overseas, he needs to go to get his fix of Chinese Fried Rice....One reason being...he can never live without his rice and second reason being there's always a Chinese restaurant everywhere you go.. and sometimes in the least expected town out of no where.... you'll find a Chinese take out restaurant.

My fridge was getting empty and I'm still trying to maximize everything before I stock up at the grocery store. No, it's not that the grocery store is far from me, in fact I can easily walk there in 5 minutes! It's just being lazy and trying to make sure I utilize as much as I have first before buying more food.

Chinese Sausage is one thing that keeps pretty well, and it's something that I will usually have in my fridge. I love it in fried rice as well as dishes like Claypot Chicken Rice. Chinese Sausages (or more fondly known as Lap Cheong in Cantonese are like many western cured dry sausages like salami and chorizo. Lap Cheong is sweet and salty, and unlike Chorizo it's not spicy. I believe Chinese Sausages are mostly cooked before consuming unlike the salami where you can just sliced it up and munch it with some cheese and wine.

Combining my 2 favorite items; chinese sausage and eggs and a limited pantry, I made egg & chinese sausage fried rice. In this recipe, I cooked the egg separately as I prefer bigger chunks of scrambled egg. Overnight rice is the best option for fried rice, so that you do not get wet soggy fried rice. I planned ahead for this meal by cooking extra rice the night before so that I have extra rice for today's dinner menu. Here's the recipe!


EGG & CHINESE SAUSAGE FRIED RICE RECIPE
*Serves 3-4

Ingredients

  • 4 Chinese Sausage, Casing Removed & Sausages Sliced Thinly
  • 3 Crabstick, Sliced (Optional)
  • 4 Large Eggs, Lightly Beaten with 1 Tsp Soy Sauce
  • 4 Cups Overnight Rice
  • 1 Cup Frozen Peas (or Frozen Mixed Vegetable)
  • 2-3 Cloves Garlic, Chopped
  • 2 + 1 Tsp Tbsp Vegetable Oil
  • 1 Tbsp Oyster Sauce
  • 2 Tbsp Premium Light Soy Sauce 
  • 2-3 Dash of White Pepper,  ( or To Taste)
  • 1 Stalk Green Onion, Chopped

Method
Heat wok over medium high heat. Stir in sliced chinese sausage and let the fat render. Once the sausages are slightly brown, remove sausages from heat and place in a bowl. Do not clean the wok.

Add in 1 tsp of oil into the same work and add beaten eggs. Stir it occasionally and break the eggs into pieces. Continue cooking the egg until you get a dry scrambled egg consistency. Remove scrambled eggs from heat and place with the sausages. Do not clean the wok.

Heat 2 tbsp of oil in the same wok over medium high heat Then add chopped garlic and sliced crabsticks and saute mixture until garlic is slightly brown. Add frozen peas and continue to stir mixture until peas are defrosted. Reduce heat to medium, then add overnight rice, chinese sausages, scrambled eggs, oyster sauce, light soy sauce and dashes of white pepper into the wok. Stir occasionally for about 4-5 minutes so that everything is mixed well. Serve immediately with sprinkles of chopped green onions.

June's Comments : As the chinese sausages are already salty, I try not to add too much sodium to the rice. If you eat every spoonful of fried rice with a piece ( or two) of the chinese sausages, that should give you enough sodium in every bite! 
You can get Chinese Sausages in most Asian grocery stores, and even some American grocery stores ( if there's a huge Asian population in the area). You can even get it on Amazon.com ( this is the brand I use).  

Simply June 

Tuesday, July 31, 2012

Easy Udon Miso Soup

After a weekend of hosting friends at our place which also involves a whole lot of non stop eating and drinking. I wanted something lighter and healthier for the husband and I. OK, maybe the side of panko crusted shrimp with my noodles isn't the healthiest option....but it was good (and easy to make!!). =)

This posting is actually for my brother. Since we moved, he now doesn't have his sister to make dinner for him. In my recent conversation with him, I told him that I will come make some easy stuff and post it here for him. This way, he doesn't have to spend too much time to make dinner after work or spend too mch money eating out!

With the right ingredients in your fridge/pantry, you could easily make this miso noodle soup quickly. It's perfect pick me up on a cold gloomy day or bright sunny days like in California.

Udon is a thick Japanese wheat noodle and while I used udon in my noodle soup, feel free to use soba noodles or even pasta! I usually find my udon in the refrigerated section of the Asian grocery store and even the American stores. You can also find dried udon but I've yet to try them out. As for Soba noodles, most Asian aisle in your local grocery store would carry them in a dry form. You'll need to cook the noodles first before using them. Here's the recipe for one hot delicious (and quite healthy) bowl of udon miso soup!


EASY UDON MISO SOUP RECIPE
*Serves 1
Ingredients
  • 1 Tbsp White Miso (plus a little more if you want it a a little more salty)
  • 1/2 Tsp Dashi Granules
  • 2 Cups Water
  • 1 Bundle/Package fresh Udon noodles, blanched
  • 1 Tsp Chopped Green Onions 
  • Small bundle of shimeji mushrooms (optional)
  • 1 -2 Pcs of Crab Stick, blanched (optional)
  • 2-3 Slices Japanese Fish Cake (optional)
  • Handful of your favorite vege, blanched (optional)
  • Thin Shreds of Nori (optional)

Method
In a small pot, add dashi and water and let the mixture come to a boil over medium high heat.  Then, add mushrooms and japanese fish cake and let it simmer until mushrooms are soft. Ladle about 1/2 cup of stock into a bowl, and carefully whisk in the miso until smooth. Pour the miso mixture back into the pot and turn off heat once the miso soup starts to simmer.

In a bowl, add the blanched Udon (or noodle of choice), crab stick and vege. Carefully ladle the hot soup along with the fish cake and mushrooms over the noodles. Top with chopped green onions and shreds of nori. Enjoy immediately!

Notes: There're various kind of miso and some of the most popular ones are white (Shiromiso), red (Akimiso) and mixed (Awasemiso). The differences between these miso are the the intensity and the saltiness. White miso being the mildness has the shortest fermentation time. If you do not have white miso in your pantry, feel free to use red miso. You might need to readjust the quantity of the miso though to get the correct level of saltiness to your preference.


Simply June 

Thursday, April 8, 2010

Pasta Scramble-Nara

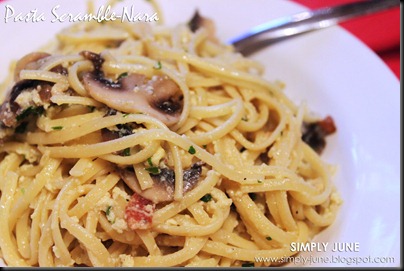
That was the name the husband gave my attempt at cooking Pasta Carbonara. I’ve always loved eating pasta carbonara but have never learnt the proper to make it. I googled for a recipe sometime ago and have never gotten the chance to try it out until a couple weeks ago.

Do you know that the white creamy carbonara sauce contain egg? Yes, whole egg or egg yolk is one essential ingredient in making the sauce. I was very surprised as well. I’ve always thought it was cream. I guess this is what makes it different from Alfredo sauce.

So, I made some the other night and used Tyler Florence’s Spaghetti Alla Carbonara recipe. The recipe seem quite easy enough and the reviews were great. I did add some mushrooms to my version. I unfortunately misread the cooking method and overcooked the egg mixture which resulted to give me a scrambled egg like texture / sauce! Boo! Although the look wasn’t the greatest, the taste was awesome! This is my second time using Tyler Florence’s recipes and I had great results both time. My other attempt at his recipe was Chicken Marsala. Here’s Tyler Florence’s Spaghetti Alla Carbonara recipe. Please pardon my “Scramble-Nara” picture. =) User (Chef) error was to blame.

Pasta Scramblenara

SPAGHETTI ALA CARBONARA RECIPE

Ingredients:

  • 1 Lb Dry Spaghetti
  • 2 Tbsp Olive Oil
  • 4 Oz Slab Bacon, Cubed or Sliced Into Small Strips
  • 4 Garlic Cloves, Finely Chopped
  • 2 Large Eggs
  • 1 Cup Freshly Grated Parmigiano-Reggiano, plus more for serving
  • Freshly Ground Black Pepper
  • 1 Handful Flat Leaf Parsley, Chopped

Method:

Prepare the sauce while the pasta is cooking to ensure that the spaghetti will be hot and ready when the sauce is finished; it is very important that the pasta is hot when adding the egg mixture, so that the heat of the pasta cooks the raw eggs in the sauce.

Bring a large pot of salted water to a boil, add the pasta and cook for 8 to 10 minutes or until al-dente. Drain the pasta well, reserving 1/2 cup of the starchy cooking water to use in the sauce if you wish.

Meanwhile, heat the olive oil in a deep skillet over medium flame. Add bacon and sauté for about 3 minutes, until the bacon is crisp and the fat is rendered. Toss the garlic into the fat and sauté for less than 1 minute to soften.

Add the hot, drained spaghetti to the pan and toss for 2 minutes to coat the strands in the bacon fat. Beat the eggs and Parmesan together in a mixing bowl, stirring well to prevent lumps. Remove the pan from the heat and pour the egg/cheese mixture into the pasta, whisking quickly until the eggs thicken, but do not scramble (this is done off the heat to ensure this does not happen.) Thin out the sauce with a bit of the reserved pasta water, until it reaches desired consistency. Season the carbonara with several turns of freshly ground black pepper and taste for salt. Mound the spaghetti carbonara into warm serving bowls and garnish with chopped parsley.

June’s Comments: Don’t repeat what I did. I poured in the egg mixture with the heat still on…resulting in a scrambled sauce! =p

Signature

Friday, February 26, 2010

Creamy Tuna & Tomato Pasta

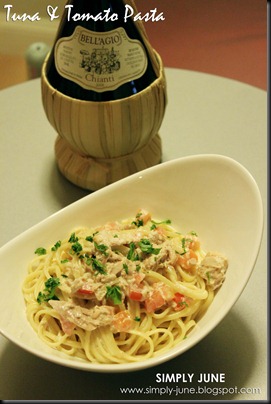
I believe my aunt taught my mom this recipe and my mom passed it down to me when I saw her make this unbelievable quick and delicious pasta. A French lady or someone who’s lived in France taught my aunt this amazing creamy tuna and tomato pasta which is now one of my favorite comfort food.

Making and eating this pasta reminds me of home somehow. I’m truly lucky that my mom enjoys cooking and trying out various recipes from different parts of the world. I’m proud to say my passion for cooking and baking has its roots; my mom.

TunaPasta

In this recipe, use SOLID canned tuna either packed in oil or water. I personally prefer the ones packed in oil as I think they are a little more flavorful. Solid Tuna as shown in picture above (left) will definitely give you chunkier, meaty tuna pieces. Yes, it does cost more, maybe double the price of the Chunk Tuna as shown in picture above (right) but the investment is worth it. Chunk Tuna pieces will disintegrate into unappetizing mushy little pieces. It taste better to able to bite into large chunks of tuna. Leave that mushy mess for your tuna salad sandwich! =P

TunaPasta1

CREAMY TUNA & TOMATO PASTA RECIPE

Ingredients:

  • 2 Cans Solid Tuna in Oil (or Water)
  • 1-2 Plump Tomatoes, Diced
  • 2 Clove Garlic, Minced
  • 1 Tbsp Olive Oil
  • 1 Cup Heavy Cream
  • 1-1/2 Tbsp Chopped Parsley
  • Salt & Pepper
  • 1/2 Lb Spaghetti or Linguine

Method:

Boil pasta in seasoned water (oil + salt) until al dente. Drain and set aside. Heat oil over medium heat and stir fry garlic until fragrant, not burnt. Then add cream, tuna and let mixture come to a boil. Once it starts boiling, add cooked pasta and seasoned with salt and pepper. Toss in tomatoes and half of chopped parsley. Transfer to serving bowls and sprinkle with more parsley. Serve immediately. This should serve 2-3 people.

Signature

Thursday, January 21, 2010

Ragu Ala Bolognese

I’ve never really ordered any pasta with Bolognese sauce. My earliest and probably my only memory of having a plate of Pasta Bolognese was when I was 11-12. I later found out that it was made from ground beef. I never consume beef back then and since then, I rarely order it unless they use chicken or pork instead of beef.

Bolognese is an Italian meat sauce which originates from the region of Bologna, Italy…..hence the name Bolognese. I had wanted some Pasta Bolognese after looking a picture my friend took in Rome, where she claimed she had the best Pasta Bolognese. After seeing that picture, I couldn’t keep my mind of the Bolognese sauce and did some search for recipes and ideas. I soon found out that the famous Bolognese sauce is not just tomato and meat. It has a list of ingredients that give the sauce an extra depth of flavors. Chopped carrots, chopped celery and cream were some of those surprising ingredients.

Most if not all the recipes I’ve seen uses ground beef, ground veal, ground pork and/or sausages. I decided to make my own Pork Bolognese. =) The sauce came up delicious. I paired it with some linguine the first night. The second day, I paired it with some cheese filled raviolis. I must say Linguine Bolognese tasted much better!! Here’s the recipe.

PastaBolognese

RAGU ALA BOLOGNESE (PORK) RECIPE

Ingredients:

  • 3/4 Lb Ground Pork
  • 1/4 Cup Finely Diced Carrot (About 1/2 Medium Carrot)
  • 1/3 Cup Finely Diced Celery (About 1 Celery Rib)
  • 1/2 Cup Finely Chopped Onion (About 1/2 Medium Onion)
  • 2 Cloves Garlic, Chopped
  • 2 Slices Bacon, Finely Chopped
  • 3 Tbsp Tomato Paste
  • 2 Cup Crushed Tomato (Canned)
  • 1/2 Cup Chicken Stock
  • 1/4 Cup + 2 Tbsp Dry White Wine
  • 1 Tbsp Red Wine Vinegar (*Optional)
  • 1/4 Cup Heavy Cream
  • 1 Tbsp sugar
  • 1 Bay Leaf
  • 1/4 Tsp Parsley Flake
  • 1/2 Tsp Dried Oregano
  • 1 Tbsp Olive Oil
  • 1 Tbsp Butter
  • Salt
  • Pepper
  • 1/4 Grated Parmesan (*Optional)
  • 1 Box Pasta (1 lb Box)

Method:

In a pot, heat butter and olive oil over medium high heat. Once the oil mixture is hot, add bay leaf, carrots, celery and onion. Stir fry mixture until onion is soft. Add bacon and stir fry until bacon is slightly browned. Add ground pork and garlic. Break ground pork unto pieces while stir frying it and browning it. The more brown you get on the pork, the more fragrant it is.

Then add white wine into the meat mixture and cook until wine has evaporated. Then add tomato paste, crushed tomatoes, red wine vinegar, chicken stock, sugar, parsley flake and oregano. Stir mixture well. Season with salt and pepper and let mixture simmer for 1hour to 1-1/2 hour over medium low heat. Remember to stir sauce occasionally.

Boil 1 x 1lb box of Spaghetti or your choice of pasta in seasoned water (oil + salt) until al-dente. Scoop some pasta onto a plate and pout sauce over. Sprinkle some grated parmesan cheese over the pasta. Serve immediately. This should serve about 4-5 people.

Thursday, December 17, 2009

Creamy Bacon & Chicken Pasta

I could have been an Italian in my past life! I love pizza and pasta and would never get sick of it. When we went to Italy (& Spain) in October, it was like food heaven for me; pizza, pasta, gelato! The household will eat pasta at least once a week. I always have a box of linguini, or macaroni or spaghetti in my pantry. Whenever I ran out of idea of what to cook, as long as I have a box of pasta…I’m pretty much all set!!

I love bacon in pasta as it gives the sauce a nice smoky flavor. This recipe here is inspired by a pasta I had at Friday’s years ago.

CreamyBaconChickenPasta

CREAMY BACON & CHICKEN PASTA RECIPE

Ingredients:

  • 10 Oz Uncooked Pasta (Spaghetti, Fettuccini, Linguine, or etc)
  • 10 Oz Roasted Chicken, Chopped
  • 4 Oz Fresh Mushroom, Sliced
  • 4 Pieces Bacon, Cut into 1/2”
  • 1 Medium Onion, Chopped
  • 3 Cloves Garlic, Minced
  • 1-1/2 Cup Heavy Cream
  • 1/2 cup Chicken Stock
  • 1 Tbsp Oil
  • Salt
  • Black Pepper
  • 1-2 Tbsp Chopped Parsley
  • Parmesan Cheese (*Optional)

Method:

Boil pasta in seasoned water (oil + salt) till al-dente. Set that aside.

In a large pan, heat oil over medium high heat. Then add bacon and sauté bacon until it starts to shrivel and brown. At this point add onion and garlic. Continue to sauté until onion started to soften. Add roasted chicken and mushroom and stir fry till mushroom starts to wilt. Pour in chicken stock and heavy cream and continue cooking until sauce thickens slightly.

Once sauce starts to thicken, add cooked pasta. Toss pasta well so that it’s thoroughly coated in the sauce. Season with salt and pepper to taste. Sprinkle some chopped parsley and serve with some grated parmesan cheese! This should serve about 3-4 people.

June’s Notes: Make it slightly healthier by adding about 1/4 to 1/2 cup of frozen peas or chopped tomatoes! If you add frozen peas, you could add that in when you pour in the liquid. If you add tomatoes, add that in at the very last; when you sprinkle the parsley!

Monday, November 9, 2009

Lobster Macaroni & Cheese

The sound of Macaroni and Cheese sounds heavenly but the sight of it where the macaroni is all coated in Orangy goo, just scare the daylight out of me! The best macaroni and cheese I had was the King Crab Mac & Cheese @ Phillips Seafood in Baltimore, MD. The second best perhaps a Truffle (Infused?) Mac & Cheese I had at Medici Cafe @ Las Vegas Ritz Hotel. Ahh… how I would die to  be able to eat them right now!!

Anyways, having experiment with Mac & Cheese a couple times and trying to create perhaps an adult version of it, I decided to make it for my Halloween Dinner. I thought it turned out well except this silly chef forgot…SALT!! With Salt added, the Mac & Cheese was YUMS!

So this recipe was inspired by the King Crab Macaroni & Cheese I had. The cheese is overall subtle and perhaps not overly cheesy. That way you can eat more and not get filled up quickly by all those cheeses! =) If you’re looking for a super duper cheesy Mac & Cheese, this recipe is probably not for you…well unless you add more cheese to it!

MacNCheese

LOBSTER MACARONI & CHEESE RECIPE

Ingredients:

  • 2 Cups Chopped Lobster Meat
  • 5 Oz Asparagus, Cut into 1”
  • 1/2 Cup Chopped Onion
  • 1/2 Tbsp Minced Garlic
  • 2-1/2 Cups Macaroni Elbow
  • 3 Tbsp Butter, Divided
  • 2 Tbsp Flour
  • 2 Cup Milk
  • 2-1/2 Cup Grated Cheddar Cheese
  • 1/3 Italian Breadcrumbs
  • Salt
  • Pepper

Method:

Boil pasta in seasoned water (oil + salt) until al-dente. Drain and set aside. Melt 1 tbsp of butter in a pan and add garlic and onion. Once garlic and onion have started to brown, add asparagus and stir fry until asparagus is tender. Remove and set aside.

Preheat oven to 375F. Melt 2 tbsp butter in a large pan over medium high heat. Whisk in flour and stir vigorously to avoid clumps. Stir in milk and let it simmer for 5-10 minutes. Add cheese and cook until cheese has melted. Add in asparagus, lobster, cooked macaroni and mix them well. Season with salt and pepper to taste. Transfer macaroni mixture into a 9” x 13” glass baking pan. Top macaroni with bread crumbs and bake in oven for about 20 minutes. This should serve 5-6 people as an entree.

June’s Notes: Feel free to use chopped grilled/rotisserie chicken instead of lobster. If you do not have Italian breadcrumbs in your pantry, feel free to use Panko breadcrumbs. Melt about 2 tbsp of butter and toss in about 1/2 cup of Panko breadcrumbs before topping your macaroni. Bake until the panko turns golden brown!

Wednesday, September 9, 2009

My Ultimate Lasagna: Chicken & Eggplant Lasagna

I almost never eat lasagna in a restaurant as they usually contain beef. It’s not that I dun take beef, I’m just very picky when it comes to beef and only eat beef, when it’s cooked Korean BBQ style. =P. The few times I ate lasagna was when my friends made them. A few years ago, my friend Kristen made a chicken lasagna and a eggplant lasagna and brought them along to our ski trip. They were awesome. I’ve written a bit of her delectable lasagnas HERE. I’ve since been making lasagnas and have attempted making the lasagnas combining both chicken and eggplant into one dish! =) This time, I took the time to write everything down and sharing it here!

It does take up a bit of time to prep the ingredients to built this lasagna. But it’s surely worth the effort! My lasagna is not overly wet as I don’t like my lasagna to be overly soggy or drenched in too much sauce. I like making my own pasta sauce (it’s fairly easy), though you could always use store bought sauces and save yourself some time! =). Don’t let this recipe scare you away from trying it! Lasagna1I use the Barilla’s “No Boiling Required” Lasagna sheets since I don’t want to pre-boil my my pasta or risk ending up with uncooked lasagnas. You should be able to find this pasta at the pasta aisle at your local grocery store!

Lasagna4

CHICKEN & EGGPLANT LASAGNA RECIPE

Ingredients:

  • 1 Lb Eggplant
  • 1 Lb Chicken Breast (About 2 pcs)
  • 4 Cups Shredded Mozzarella Cheese
  • 1 Container (15 Oz) Ricotta Cheese
  • 1/3 Cup Grated Parmesan (Add up to 1/2 Cup if desired)
  • 2 Large Eggs
  • 1/2 Cup Italian Seasoned Breadcrumbs
  • 1 Cup + 1 Tbsp Oil
  • 1/4 Tsp Salt
  • 1/4 Tsp Black Pepper
  • 1 Tbsp Chopped Parsley
  • 1 Package (9oz) Barilla’s (No Boiling Required) Lasagna
  • 5-1/2 Cups Red Pasta Sauce (Refer below for recipe)

Method:

Slice eggplant to about 1/2” thick. Spread them on a baking sheet (lined with foil), doused with 1 tbsp of oil and season with salt and pepper. Baked them at 400F for about 15-20 minutes. Set aside.

Heat pan with 1 cup of oil. Slice chicken breast to about 1/2” thick. Coat them in breadcrumbs, and shake off excess. Fry breaded chicken breast for about 2-3 minutes on each side till golden brown. Set aside.

In a medium bowl, beat eggs then add ricotta cheese, parmesan cheese and 1 cup of mozzarella cheese. Mix cheese mixture well and set aside. Preheat oven at 350F.

In a 9x13 (and about 2-3 inch deep), pour 1-1/4 cup of sauce, then layer with Lasagna sheets (it’s ok to slightly overlap them). Spread about 1/2 of cheese mixture, arrange chicken pieces (making sure each bite will have some chicken), 1-1/4 cup of pasta sauce and 1 cup of mozzarella cheese.

Then, layer with lasagna sheets, spread remaining cheese mixture, arrange baked eggplants (again, making sure that each bite will have some eggplant), 1-1/4 cup of pasta sauce and 1 cup of mozzarella cheese.

Lastly, layer with remaining pasta sheets (I ended up with one sheet of unused one). Pour remaining sauce over it and top with remaining mozzarella cheese. Cover with foil and bake in preheated oven for 50-60 minutes. Remove foil, sprinkle parsley and continue baking for about 5-10 minutes or until cheese melts and turns slightly brown. Let pasta cool a bit before serving! This should give you enough pasta for 6 people!

Lasagna3

-----------------------------------------------------------------------------------------------------------------------

HOMEMADE RED PASTA SAUCE RECIPE

Ingredients:

  • 2 Tbsp Minced Garlic
  • 1-1/2 Cup Chopped Fresh Mushrooms
  • 1-1/2 Cup Chopped Onions
  • 1/2 Lb Ground Meat
  • 1 Large (28 Oz) Can Crushed Tomatoes
  • 2 Tbsp Chopped Parsley
  • 1 Tsp Black Pepper
  • 1 Tsp Salt
  • 1/2 Tsp Oregano
  • 3 Tbsp Butter
  • 1 Tbsp Sugar
  • 1-1/2 Cup Water

Method:

In a pot, add garlic, onion and butter. Stir fry till onion is soft and fragrant. Add ground meat, salt, pepper, oregano and stir fry meat while breaking it into pieces. Continue stir fry until meat is cook before adding mushroom. Cook mushrooms until it shrinks, then stir in crushed tomatoes, parsley, sugar and water. Let sauce simmer over medium heat for about 15-20 minutes. Season with more salt and pepper if desired. Set aside sauce to cool. This recipe should yield you about 5-1/2 cup of pasta sauce. You may even use this sauce with spaghetti.

June’s Notes: You can get the canned crushed tomatoes from any of your local grocery store in the US. I usually go for the store brand. =)Lasagna

Wednesday, April 15, 2009

(My Ultimate) Lasagna???

I was never really a fan of lasagna until my friend Kristen made some about 1- 2 yrs ago. 8 of us drove to Maine and each of us contributed some food for our 2 days 2 nights stay at this very quaint and well equipped rented private home near the ski resort.

Kristen made 2 AWESOME lasagnas; egg plant and chicken! It was one of the best lasagna I’ve tasted and not your regular meat sauce kind. So yum, I asked her how she did it and almost bought ingredients to make my own lasagna when we return home to MA. I’ve started to make lasagna ever since!  

Anyway, I made some last night and this was one of the best tasting lasagna I’ve made. No specific recipe what so ever, just cook it like how I usually would. Only difference, I had loads of different stuff in it. Hence making it the Ultimate Lasagna. I will try to recreate this next time and share the recipe.

As for now, I’ll just debrief (My Ultimate) Lasagna. First, I baked some sliced eggplant coated in some Italian Breadcrumbs. Then sauté some mince garlic and onion in a pan. To it I added ground pork, continue to fry it till about 80-90% cooked then added sliced mushroom. Season with salt, pepper, sugar chili powder and oregano. Remove and set aside about 2/3 of the meat mixture. Add a large can of crushed tomatoes to the remaining 1/3 of meat mixture and cook till sauce is warm. **I almost always make my own pasta sauce!

Lasagna Lasagna-1

When almost ready to assemble, I mixed ricotta cheese, black pepper, eggs and chopped spinach in a bowl. In a baking dish, layered the tomato sauce, pasta sheets (I used non cooked ones), spinach ricotta mixture, meat mixture, baked eggplant and loads of shredded cheese. Once it’s all layered, sprinkled some chopped parsley and baked it for 45 minutes covered in foil and remove foil to let it bake for another 10-15 minutes.

Voila! My cheese laden Ultimate Lasagna! Mmm……. I would really love to try make Lasagna using Bechamel Sauce instead of tomato sauce next time!

Lasagna-2

Tuesday, March 3, 2009

Japanese Twist To Pasta

I love pasta especially when it’s served with white cream sauce …yum-yum! I can eat pasta all day long, ok maybe not all day long..but I won’t reject a plate of pasta with white cream sauce (not quite a big fan of red sauce pasta!)! Yesterday, I made pasta with a slight Japanese twist. I got so inspired after watching something from the Food Network (I think) and recalled my mom’s pasta dining experience in Japan many years ago.

I thought the touch of Panko and Nori to the pasta turned out really well! I enjoyed the crunchy texture the Panko gave the pasta! I loved it so much, I can’t wait to just share this recipe here! I hope you will enjoy this recipe as much as I’ve enjoyed creating and sharing it!

Pasta-2 

SHRIMP & PEA PASTA (WITH A JAPANESE TWIST) RECIPE

Ingredients:

  • 2 Cups Rotini (short twisty/spiral pasta) or any short pasta of your choice
  • 8 Jumbo Shrimp, Quatered ( This gave me about 1/2 cups shrimp – that’s all the shrimp I have in the freezer! That’s why I had to be frugal with the shrimp and cut it up!!)
  • 1/2 Cup Frozen Sweet Peas
  • I Small Onion, Chopped
  • 2-3 Garlic Cloves, Chopped
  • 3 Tbsp Butter
  • 1 Cup Heavy Cream
  • 2-3 Tbsp Grated Parmesan
  • 1 Tbsp Fresh Parsley, Chopped
  • Salt & Pepper
  • 1/3 Cup Panko (Japanese Breadcrumb)
  • 2-3 Pcs Ajitsuke Nori (Japanese Seasoned Crispy Seaweed Snack), Cut Into Strips

Method:

Boil Rotini pasta or any pasta of choice till al dente and remove. In a separate pan (medium heat), toast Panko till slightly golden brown – stirring constantly. Then, add 1 tbsp of butter to the toasted butter, stir it and brown it a little more. Transfer to a small bowl. In the same pan (medium heat), melt remaining butter and add chopped garlic and onion; cooking them till soft. Stir in shrimp and frozen peas, letting them cook for a while before adding heavy cream and parmesan cheese. Simmer sauce before stirring in cooked pasta and parsley. Season with salt and pepper to taste. Make sure pasta is well coated with the white cream sauce. Transfer to a serving platter or individual plates.

Now, here’s the Japanese Twist to the pasta……Top up the pasta with the toasted Panko and sprinkle strips of Ajitsuke Nori. Serve immediately! This serves 2!

If you do not have Panko or Nori, you can still serve your pasta; of course there will be no Japanese twist to the pasta now! Top it up with more chopped fresh parsley and or some parmesan cheese.

The toasted Panko will give the pasta a nice crispy bite to it! If you decide to try this recipe, please let me know what you think! =) Good Luck!Pasta-1

Related Posts with Thumbnails