Friday, February 5, 2010

Celtics VS Nets

I’m off to a NBA game in a couple hours. It’s been almost a year since I went to a game and I’m excited! I love catching a live basketball game! Hubby will be stuck at work (boo!), but I’m sure I’ll be having a blast with my friends Seyda, Rob and Chris! =)

I hope the Celtics will win this game. They haven’t been doing that great recently! I have been a Chicago Bulls fan for the longest time and finally switched team after living in Boston for a couple years. It’s definitely more fun cheering for the home team!! =)

   VS  

GO CELTICS!!

Thursday, February 4, 2010

Bob’s Clam Hut @ Kittery, ME

Over the weekend, hubby and I decided to go for a scenic drive along the coastline traveling from Massachusetts to Maine. After doing some shopping at the outlet mall in Kittery (Maine), we decided to hunt down a place for some yummy lobster roll. We did not want to spend too much and eat at a fancy place and found this little shack not too far from the outlet mall.

Bob’s Clam Hut it is! Walking into the “hut”, we realized that it was quite packed. There were people waiting for their food, and people in line ordering their food. It seems we’ve arrived at the right place or a tourist trap?? We ordered and I went inside to look for a seat. There were some bar style seating as well as regular dining seating further in. It was quite packed but we were lucky to grab the last table available.

BobClamHutBobClamHut1

Here’s what we ordered. Hubby went for the Whole Clam Roll (Bottom Left) @ $13.95. The clams have a light coating of batter and fried to golden perfection and then stuffed into a lightly toasted hot dog bun. The batter was crisp, and the clams quite meaty. May I add that the clams were quite fresh and large. It was nice that the roll came with a side of yummy fries (and pickle)which was again fried to perfection. Crisp on the outside and moist in the inside.

I ordered the Lobster Roll (Bottom Right) @ $12.95. The lobster salad is served the usual style; cold. Large chunks of lobster very lightly coated in mayonnaise which allows you to savor the real taste of the naturally sweet lobster meat. No fillers and nonsense in the lobster salad which was piled on a lightly toasted bun, which I would prefer if they slather some butter on it as well. =) Fries also came with my lobster roll, although the fries were significantly less than what hubby got. I think I got merely 10 pieces of fries, the man got double. I’m starting to wonder if the fries went straight into hubby’s tummy before it made it to me. =)

Their tartar sauce was very good too! It was light, slightly tangy, slightly sweet (I think) and definitely better than McDonald’s tartar sauce which I will always scrap of the fish whenever I order a Filet O Fish sandwich.

BobClamHut2BobClamHut3

Prices for some of the item on the menu are Market Price and most likely changes every other day or so. They have a variety of combinations and options for their seafood. The prices are kinda inline with most seafood “shacks” I guess. I do appreciate that their rolls came with fries unlike at Sea Swirl. Portions were just decent as it did not quite fill us up to the brim. For $30, we definitely can get better bang for our buck at the dimsum restaurant or something…..But hey, who says seafood is cheap anyway?

BobClamHut4BobClamHut5

There are parking in the premises and since it’s near the outlet mall…..head over to Bob’s Clam Hut for lunch break or a snack after shopping! They are located at:

315 Us Route 1
Kittery, ME 03904-5618
(207) 439-4233

Wednesday, February 3, 2010

Sightseeing Vatican City - October 9, 2009

Another part of my overdue Europe trip post….Although we walked through the grounds of Vatican City everyday, we finally managed to squeeze in some time to check out the spectacular St. Peter’s Basilica / Basilica Papale di San Pietro. The basilica has the biggest in the world with the capability to hold up to 60,000 people. Construction of this church began in 1506 and completed in 1626. You will find works of many artist especially Michelangelo and Bernini in the church.

We were at St. Peter’s during the end of the day, around 4.30 – 5pm. I think the entrance closes at 5.30pm. The line wasn’t too long and the only crawl was basically going through the airport screening like security. There were also signs on the proper attire to enter church grounds; basically nothing too revealing.

VaticanVatican2 

We’re all awestruck with the interior of the church. It’s HUGE! Everything looks so amazing! At the end of the main tribune /apse (Bottom Left) lays a grand gold and bronze monument. The sculpture was created by Bernini to enclose the wooden throne of St. Peter. The Baldacchino rising above the Papal Altar (Bottom Center) itself was gigantic and mind boggling. This is another work of Bernini and St. Peter’s tomb lies beneath the altar. The grand dome sits in the center of the church (Bottom Right) which is the largest dome in the world. The dome was started by Michelangelo before he died and was finished by  Giacomo della Porta in 1590 is the tallest dome in the world.

 Vatican4 Vatican5 Vatican3

More intricate and beautiful work inside the church (Bottom Left). Monument to Pius VIII (Bottom RIght) is just one of many sculptures/statues inside the church. Did I mention that entrance to St. Peter’s Basilica is FREE??

Vatican6 Vatican7

And how could I not take pictures of the famous Swiss Guard (Bottom Left) @ Vatican City!!?? Look at how cute the guard is in his little outfit.

After the impressive visit to St. Peter’s Basilica, we headed back to our B&B to wash up and get some dinner before heading out again. Dinner that night was cheap and easy since there was a grocery store below our B&B. We bought sandwiches for Euro 1 and beer for Euro 0.45 a can! =)

After dinner, we were off to the Vatican Museum. Yes, you read it right…we went to the museum after the sun sets..after dinner. They happen to open the museum at night in the months of September and October, so we decided to jump on the opportunity for our version of Night at the Museum. We bought out ticket online in advance (in the US) for Euro 17 or Euro 18. That includes the premium fee of Euro 4 to get the ticket in advance and online to avoid the long lines of getting the ticket. We also have to pick the time we want to enter the museum and arrived there minutes before. Exactly at 7.30pm (the time we picked), we were called to enter the museum. This is so much better than waiting under the scorching sun to get into the museum during the day. I’ve heard stories and seen pictures were people lined up for 2 hours just to get into the Vatican Museum.

Here are some pictures we took inside the museum grounds. Photography is allowed inside the museum except the world famous Sistine Chapel. I did see a few tourist nonchalantly ignored the photography warning and snapped a picture or two of the famous painting by Michelangelo, the Creation of Adam. Rules are rules and I’m proud that I stuck by it. All I did was just soak in the masterpiece with my eyes and memories. Impressive as it may seem, I honestly almost missed the painting on the ceiling!

Vatican8 Vatican9 Vatican13

One of the world’s greatest museum houses plenty of artifacts of different make, history and origin.

Vatican10Vatican20

One of the highlights of my Europe trip are the ceilings! Seriously, I was truly impressed with their ceilings. Be it the ceiling inside the Vatican Museum, or an small little church… I can’t help but be amazed with the masterpieces and take pictures after pictures of them!

Vatican12Vatican11

Each of them are all unique and are just incredible. I did not get bored with the intricate details of the ceilings. Although, I could feel my neck getting stiff after a while! =) It was nothing a yummy gelato can’t fix. Haha!

 Vatican15 Vatican16 Vatican14

Did I mention I love those Roman ceilings?? And I’m serious when I said I took tons of pictures of them! The picture on the bottom right is a mosaic floor for a change. =)

Vatican18Vatican17 

The whole Night at the Museum trip took us about 2 hours plus. It was nice that it wasn’t overly crowded so we could really enjoy ourselves there. Too bad, there wasn’t a Rexy we could play with and no we did not see Genghis Khan!

Tuesday, February 2, 2010

Indonesian Layer Cake

Updated February 10, 2009 : With the addition of milk per my mom’s suggestion, the cake turn out very moist!!

Indonesian Layer Cake or better known as Kuih Lapis or Spekkeok to my Indonesian friends is one of my favorite cake. This cake although can be found in bakeries, it is more commonly made during Chinese New Year. It’s a special occasion cake because it is VERY tedious / labor intensive to make. If you were to buy this cake from the bakery, they do charge you quite a bit for it. Hence, this cake is always served thinly sliced. It is also usually baked in a square cake pan.

The Indonesian Layer Cake is formed by baking/grilling one layer of batter at a time until you get the desired height for the cake. It takes a bit of practice to get the layers just right; not to thick, not to thin and even throughout. Also, you really have to keep a watchful eye on the cake as it does burn easily.

Since CNY is just around the corner, I decided to make some. After googling around for a recipe, I decided to settle with THIS. The reason I tried this recipe was the use of equal amount of egg yolks vs egg whites. Most of the recipes I see out there uses more egg yolks than egg white. It’s not for health reasons why I did not choose the recipe with probably a higher cholesterol and is definitely richer…..it was just simply coz I did not want to be wasteful or think of something to do with 12 egg whites!! Of course I could bake some Meringues, Pavlova or French Macarons….but I already have a plethora of Chinese New Year goodies to bake.

The cake came out light and not as oily as some recipes I’ve tried in the past. I was at first hesitant to share the recipe as I thought the cake was a little dry…but now I think the cake actually tasted better the next day or two as I felt it became a little more moist after that. I baked about 1-1/2 portion of the recipe and ended up with 2 x 7” square cake. I only have a quarter left. Instead of hunting down another recipe, I think I’ll stick with this one for my next batch of Indonesian Layer Cake. Here’s the recipe extracted from Li of Kitchen Musings with my slight modification.  Yums! Hubby and I like to peel the layers and eat it savor it slowly……….

KuihLapis

INDONESIAN LAYER CAKE / KUIH LAPIS RECIPE

Ingredients:

  • 14 Large Eggs
  • 300 gm Granulated Sugar
  • 2 Tsp Vanilla Extract
  • 3 Tbsp Brandy
  • 5 Tbsp Milk
  • 300 gm Butter, Diced and Softened
  • 180 gm All-Purpose Flour
  • 1/2 Tsp Mixed Spice

Method:

Preheat oven to 350F @ grill setting, place rack in the top shelf of the oven. Sift flour and mixed spice and set aside.

Line the base of a 8x8 square baking pan with parchment paper. Do not grease the sides of the cake pan. Separate egg yolks from the egg whites. Beat egg yolks, 200 gm of sugar, vanilla and brandy until mixture is very thick and pale.

Gradually add softened butter and beat until well combined. Fold flour and spice into this mixture. Add in milk, combine and set aside.

Whisk egg whites in a separate clean and dry bowl gradually adding remaining sugar until soft shiny peaks form. Fold egg whites into the buttery mixture gently knocking as little air out of the mixture as possible.

Preheat cake pan in the oven for 1 minute. Remove pre-heated tin from the oven and spread cake batter evenly. You may tap the cake pan on the kitchen counter to help distribute the batter evenly. Cook until the top of the layer is golden brown. This takes around 5-7 minutes. Keep a close eye on it! Remove cake pan when the surface of the layer is brown, poke holes with skewer and spread another layer of cake batter on top of this. Repeat until all the cake batter is used up.

Run a knife along the edges of the cake and invert the cake onto a wire rack to cool. Remove the parchment paper on the base of the cake before the cake has cooled completely.

June’s Comments: I deviated a little from the original recipe…What’s new? =) I substituted brandy with whiskey coz that was what I have. Since I did not have mixed spice in my pantry, I use about 1 tsp of Pumpkin Spice instead.

My butter somehow wasn’t soft enough even though I’ve already left it out at room temperature for HOURS! After beating in the butter, I ended up with annoying lumps of butter. I therefore blended the mixture so that the mixture is smooth before I added the egg whites. Oh yeah, I pour about 1/2 cup of batter for each layer.

My oven does not allow me to set the temperature for the grill (broiler) function. All it had was a high and low for the broiler function. I set mine to high and place the rack second from top. Baked the cake and rotate it once. I did not time how long I baked it for and just remove the cake when it’s golden brown. I sometimes lost track of time and hence ended up with some darker layers.

Monday, February 1, 2010

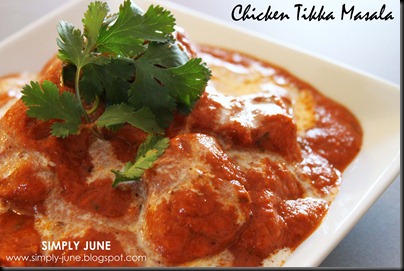
Chicken Tikka Masala

One of my favorite curry dish in the US is Chicken Tikka Masala. Very often this would be something I order at an Indian restaurant or the first thing I hit at the buffet line. I always look forward to some Chicken Tikka Masala at the buffet line and if I don’t see any, I do get a lil’ disappointed I just love the semi sweet and tangy creamy curry sauce with the hint of cilantro. Yes, I love cilantro! Cilantro is one herb you’ll find in my fridge every single time!! Whenever I make a grocery run, Cilantro and Green Onions are 2 herbs you’ll find in my shopping cart!!
Anyway, I love the Tikka Masala curry so much that I’ve attempted on my own….with SUCCESS! =) I’ve tried various recipe for this curry and decided there’s one recipe I liked the best, of course with my little changes. That Tikka Masala recipe had gained compliments from my friends when I made about 8 different curry dishes, mostly from scratch and fed about 12 people. It was a “Curry-Oke” party we organized a few years back.
The Chicken Tikka Masala recipe originates from the book “Curry Cuisine” which contains a vast collection of curry from different regions in the world by various chefs and is published by Fall River Press.
For those of you who’s never heard of this curry, Chicken Tikka Masala is a curry dish (usually not very spicy) with chunks of roasted chicken in a spiced creamy tomato based sauce with cilantro. This dish is believed to have originated from Britain. Read HERE for more information on my favorite dish.
This is the tweaked version and how I made my Chicken Tikka Masala based on the ingredients I have in my pantry. Preferably, the sauce is cooked one day ahead so that it achieves a richer flavor and will taste so much better!! =)
ChickenTikkaMasala
CHICKEN TIKKA MASALA RECIPE
Ingredients:
  • 7-8 Pcs Pan Fried (Boneless) Chicken Tandoori (Recipe HERE)
  • 1 Large (28 Oz) Can Crushed Tomatoes
  • 4 Tbsp Tomato Paste
  • 1/2 Cup + 2 Tbsp Chopped Cilantro (Do Not Compress)
  • 2 Inch Ginger, Chopped
  • 3 Clove Garlic, Chopped
  • 1 Tbsp Lime Juice
  • 3 Tbsp Sugar
  • 1 Tbsp + 1-1/2 Tsp Ground Cumin
  • 1/2 Tsp Ground Coriander
  • 1/4 – 1/2 Tsp Cayenne Pepper (*Based on how spicy you want it to be)
  • 1/2 Cup of Heavy Cream (Plus more if needed)
  • 1/4 cup – 1/2 Cup Chicken/Vegetable Broth (*Optional)
  • 3 Tbsp Unsalted Butter
Method:
Cut the cooked boneless Chicken Tandoori into halves or quarters.
Combine crushed tomatoes, tomato paste, 1/2 Cup cilantro, ginger, garlic, lime juice and sugar in a blender and process until smooth. Over medium high heat, melt butter in a pot and sauté cumin and coriander until spices are fragrant. Add the tomato mixture and cream into the butter mixture. Let mixture simmer. Add some chicken or vegetable broth to the mixture if you prefer a thinner consistency for the sauce. You may also add some heavy cream to it for a creamier sauce. Add in cooked chicken pieces and let mixture come to a simmer and continue to let it cook over medium low heat for about 15 minutes. Do stir occasionally to avoid the sauce from burning!
Transfer the Chicken Tikka Masala onto a serving dish. Sprinkle with remaining cilantro and drizzle some heavy cream onto it before serving. Serve over rice or Naan. This should serve 6-8 people.
June’s Comments: What I did was use half of the sauce mixture and save the remaining for use the next day. Hubby and I ate the Chicken Tikka Masala over 2 days. So, if you can’t finish as much do like what I did or you could cook half the chicken and use half the sauce for one day. The remaining of the sauce, you could always add some sautéed shrimp or cut up some paneer (Indian Cheese) or tofu and add them into the sauce.
If you can’t take heat, skip the Cayenne Pepper altogether. I like to add some coz I think it taste better with some tingling heat! =)
The thickness, the creaminess and the heat level of the sauce is all personal preference. Feel free to adjust accordingly!!
Related Posts with Thumbnails