Pages

Wednesday, October 16, 2013

Apple & Peach Salsa

While I was making some pork carnitas yesterday for my taco, I realized I forgot all about some kind of salsa to go with taco. Since the pork is kinda rich and heavy, I knew I needed something light to cut down the richness of the pork. Not wanting to make traditional salsa, I opted to incorporate the 2 fruits I had in my fridge; apple and peach into the salsa.

I like the combination; a little crunch, a little sweetness, a little tanginess and a little heat in a bite (especially when you bite in that tiny tiny piece of serrano pepper). Adding it to some taco carnitas, I feel like I'm eating "quite" healthy! A little taste of pork carnitas and fresh salsa in one bite, YUMS! I really like the combination when I take a bite into the taco; I get the savoriness and richness from the carnitas and the freshness and lightness from the apple and peach salsa. I'm sure it will go great with some grilled pork chops or even some grilled fish. Here's the salsa recipe:


APPLE & PEACH SALSA RECIPE
**Serves 4-6

Ingredients:
  • 1/4 Medium Onion, Finely Chopped
  • 1 Medium Green Apple, Peeled, Cored & Finely Chopped
  • 1 Medium Peach, Peeled, Deseeded & Finely Chopped 
  • 1 Small Serrano Pepper, Deseeded & Very Finely Minced **
  • Handful of Cilantro, Chopped (About 1 Tbsp packed)
  • 1/2 Tsp Salt
  • 1 Tsp Sugar
  • Juice of 1 Lime
Method:

In a bowl, mix all the ingredients above. Taste and if you need more salt, sugar or lime juice, feel free to adjust. Set aside in the fridge for about 30 minutes until ready for use. Serve with your favorite pork carnitas or your choice of meat! 

**Reminder: Do not rub/touch your face or eyes after you cut the chili!


June's comments: Depending on how much heat you like or can take, add a little of the serrano pepper first, mix and taste. Add more if you like more heat to the salsa. You can also sprinkle a dash or two of cayenne pepper for more heat. But I like to keep this salsa a little more refreshing and therefore restrained from adding too much heat to it. 

Enjoy! 

Simply June 

Pork Carnitas

This dish highly inspired by the neighborhood Mexican market that runs a small Taqueria like stall at the back of the market. I remember the first time we went there to get some food, the food operators that day spoke only Spanish, and English was little to none. The husband and I ended up ordering tacos with a bit of sign language/pointing and the little Spanish we know. And we watched other customers order other delicious items to go.

The language barrier did not stop us from going back, and back, and back for yummy carnitas (braised pork) and chicarron (pork rind) tacos and/or combination plates. The husband and I are usually the odd ones out in line, but we don't care coz we love the food! However, during my last visit to the taquiera, I found that our regular food was not as good. For some reason, even though the pork was just swimming in lucious gravy a few minutes ago, it felt dry. Honestly, I was disappointed!

Since then, I was determined to replicate this dish. I gathered all the ingredients I think I needed and decided to make it for dinner tonight. Since I've planned ahead, I marinated the meat overnight before cooking it the next day. In this recipe, I added a packet of Sazon Goya to enhance the flavors. This seasoning is something like those chicken bouillon used in cooking. I happened to have a box of the seasoning from cooking a Guatemalan dish my friend taught it and decided to use it in today's pork carnitas.

I love the end product of the dish. The husband and I thought it was flavor of the pork carnitas was pretty close to the ones we get from the taquiera. Ok, if there were some chicarron in there, it would have been perfect! I served the carnitas as a taco (corn tortillas - my favorite!) and topped it off with some homemade Apple & Peach Salsa (I will share the salsa recipe tomorrow!). The husband and I enjoyed the different taste and texture from the savory pork carnitas filling and the fresh salsa topping.

Till then, here's the recipe for the Pork Carnitas. Please excuse my pictures, I had some trouble with the tortilla and plating the dish!


PORK CARNITAS RECIPE 
**Serves 3-4

Ingredients:
  • 1-1/2 lb Boneless Ribs (Pork Shoulders), Cut into large strips 
  • 1 Tsp Salt
  • 1/2 Tsp Smoked Paprika
  • 1/4 Tsp Ground Black Pepper
  • 1/4 Tsp Cayenne Pepper
  • 2 Tbsp Oil
  • 1/2 Medium Onion, Chopped
  • 1 Green Pepper, Chopped
  • 2 Clove Garlic, Minced
  • 1 Canned (14.05 Oz) Tomatoes (Wedges or Diced)
  • 2 Cups (Reduced Sodium) Chicken Broth
  • 1 Tsp Worcestershire Sauce 
  • 1 Pkt Sazon Goya (Coriander & Annato)
Method: 
Mix salt, smoked paprika, black pepper and cayenne pepper in a bowl. Sprinkle the mixed seasoning over the pork and let it marinate over night. 

In a heavy pot, heat 2 tbsp of oil over medium high heat. Once oil is hot, sear the pork for about 4 minutes on each side. Once the pork is golden brown on both sides, remove from the pot. Stir in onion, green pepper, and garlic and cook until the onions are slightly soft. Then, add canned tomatoes, chicken broth, worcestershire sauce, the sazon goya seasoning and the seared pork. Ensure that the pork is submerged as much as possible in the broth mixture (add slightly more chicken broth if required to achieve this). Reduce heat to medium low, cover and let the pork cook for about 1 hour. Check on the pork, turning it every 20 minutes or so. 

Once the 1hour is up, using a thong, gently twist the pork to check the tenderness. If chunks of pork can be shredded with the thong, then turn off the heat. If not, add a little more broth (about 1/4 cup, if the broth has become too thick) cover and continue cooking about another 15 minutes or so or until the desired tenderness is reached. 

Let the pork rolled a little before serving. Shred the pork in the pot using a fork. Alternately, chop the pork on a chopping board together with some of the gravy mixture. Serve this as a taco or over some warm rice. 

Serve it as a Taco: You can make about 10-12 pieces of tacos with the shredded/chopped carnitas. Serve the carnitas with some warm (dry toast on a pan) tortilla of your choice. Line the tortilla with a bit of shredded lettuce, then the shredded pork carnitas, cilantro and top if off with your favorite salsa.


Serve it over Rice: Serve some of the carnitas with some Spanish rice or your favorite rice dish. Add some refried beans and salsa (or a simple slaw) to complete the meal. This should be enough to feed 3-4 people. 

June's Comments: I do not need to cut the pork; they came pre-cut from the store and was perfect size for braising. Cutting the meat into smaller pieces will just shorten the cooking time. 

Even though I marinated the pork overnight (since I had time), I think you can just season the pork just before cooking. Since it's braising in liquid, the flavors will still be yummy. I braised my pork in a dutch oven (Le Creuset). Any large pot should work well to braise the pork. 

Depending on how much gravy you want at the end, feel free to add as much or as little more broth at the very end of the cooking time. If you're eating this over rice, more gravy would be yummy. If you're eating this over tacos, you don't need as much gravy. 

I found the level of saltiness perfect; if you prefer more salt in the pork carnitas, sprinkle as much or as little about 10-15 minutes before the end of cooking time. 

Enjoy! 

Simply June 

Friday, October 4, 2013

Cornbread (Muffin)

I'm never a big fan of cornbread as sometimes they tend to be a little on the dry side and too crumbly to eat. I like it when the cornbread is slightly moist and when there's pieces of corn in the cornbread.

I was having some friends come over for coffee and thought that it would be nice if I could serve them something else (I knew I wanted some kind of baked goods) besides coffee. As I was very low on eggs and butter and I had a large can of creamed corn staring at me, I decided to make some cornbread. I've never made cornbread before but I knew I needed a recipe that will give me a somewhat moist cornbread with the minimal ingredients I had.

After a bit of googling around, I found one recipe that appealed to me and decided to use the recipe with some changes. I also made the cornbread in a muffin pan so that I do not need to deal with cutting up the cornbread, and it just look much cuter this way!

I have to admit that I was nervous about the texture of the cornbread especially after being kept overnight.  The cornbread turned out nice and moist when I first ate it minutes after it came out from the oven. I wasn't sure how it would taste like the next day when I plan to serve it to my friends but was pleasantly surprised that it was still moist. Even my friend commented that the cornbread was moist and not as crumbly as other cornbreads she's had in the past and even requested for the recipe. Yay! The original recipe is posted here. Below is my tweaked version.


CORNBREAD (MUFFIN) RECIPE
*Makes about 15 (standard) muffins 

Ingredients
  • 1 Cup Yellow (Fine) Cornmeal
  • 1/2 Cup All Purpose Flour
  • 5 Tbsp Sugar
  • 2 Tsp Baking Powder
  • 3/4 Tsp Salt
  • 1/4 Cup Butter, Melted & Cooled
  • 1 Large Can (14.75 Oz) Creamed Corn 
  • 1 Large Egg, Lightly Beaten
  • 1/3 Cup Buttermilk 
Method

Preheat oven to 400F. Line muffin pan and set aside. Combine all the the dry ingredients (cornmeal, flour, sugar, baking powder and salt) in a bowl and stir. 

Then, add all the wet ingredients (butter, corn, egg, buttermilk) into the dry ingredients and stir until just combined. Scoop batter (with a spoon or ice cream scoop) into the muffin tins till about 3/4 cup full. 

Bake for about 15-17 minutes or until a toothpick inserted into the center of a muffin comes out clean. 

June's Notes: If you do not have buttermilk, no sweat. All you need is milk (I used 2%) and vinegar. Pour about 1/3 Cup of milk and about 1 tsp of vinegar into a small bowl and let the milk curdle before you use it.

You can also bake this in a lightly greased regular baking pan (perhaps about 8"). You may need to bake this for about 20 minutes or so, or until a toothpick inserted into the center of the pan comes out clean. 

Simply June 

Tuesday, October 1, 2013

Chilled Spicy Tofu

For 2 days in a row, I've been craving for something simple, a little bit spicy but yet refreshing for lunch. And I knew exactly what I needed to make; a chilled tofu dish! Again, this was something I've never had before until about 2-3 weeks ago when my friend made this for dinner. I like the simplicity  of the dish and decided to mimic it with my own twist.

In a typical Asian (Chinese) household, no cooking is required when preparing this dish as we always have some fried garlic oil and fried shallots in the pantry. As I just used my last batch of garlic oil yesterday, I had to make some for this dish. Using the microwave to make the garlic oil is probably the easiest way to make it; you don't have to stand over the stove top to stir and prevent the garlic from burning!

Anyway, the chilled tofu dish my friend made was slightly simpler without the use of the black vinegar and chili crisp, but I was in a mood of a little bit of kick in the dish!  If you don't want the dish to be spicy or do not have black vinegar and/or the chili crisp in your pantry, feel free to omit it. However, you'll probably need to increase the amount of the soy sauce and oyster sauce to 1-1/2 Tbsp to make up for the sauce. Here's the recipe:


CHILLED SPICY TOFU RECIPE
*Serves 3-4

Ingredients
  • 1 Package Soft Tofu
  • 1 Tbsp Soy Sauce
  • 1 Tbsp Oyster Sauce
  • 1 Tbsp (Chin Kiang) Black Vinegar
  • 1/2 Tbsp (Lao Gan Ma) Chili Crisp Sauce
  • 1 Tbsp Vegetable Oil
  • 2-3 Cloves Garlic, Minced
  • 1 Stalk Green Onion, Chopped
  • 1 Handful Cilantro, Chopped
  • 1 Tbsp Fried Shallots (Optional)
Method
Combine minced garlic and oil in a microwavable bowl and ensure that the garlic is submerged in the oil. Microwave this mixture for 1 minute, stir and continue for another 30 second to 1 minute until the garlic are golden brown. Carefully remove the (warm) bowl from the microwave and stir in the soy sauce, oyster sauce, black vinegar and chili crisp sauce. Set the sauce aside.

Drain all the water from the soft tofu, and invert the tofu onto a shallow bowl. Slice the tofu into 10-12 pieces if you prefer. Drizzle the sauce, sprinkle the green onion, cilantro and fried shallots. Serve immediately with some steam rice. Enjoy! 

June's notes: If you do not want it to be too cold, microwave the tofu for about 1 minute after you have inverted it onto a (microwavable) bowl. If you like a little more spiciness, add up to 1 tbsp of the Lao Gan Ma Chili Crisp Sauce; but do be very careful......it can get too spicy!! 


Simply June 

Monday, September 30, 2013

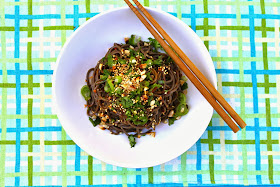
Cold Spicy Soba Noodles

A few weeks ago, the husband and I invited some of our neighbors over for some BBQ potluck. We bought some delicious pre-marinated ribs from Costco (the ribs were a big hit!!), made some vegetable skewers and provided a variety of drinks for our neighbors. Each neighbor brought different yummy dishes to share. One of my neighbor made some Sichuan "Liang Mian" (Cold Noodles) over and everyone agreed it was delicious. The noodles were simple and very refreshing, with a bit of kick from the chili. I've never had this before and even though I'm not a bit fan of Sichuan food (they tend to be too spicy for me), I liked this one and didn't feel the spiciness as much. I guess my neighbor had probably tone the spice level down a little.

After a weekend of eating out, I crave for a simple lunch. Working with the ingredients in my pantry, I decided to make my version of the Sichuan "Liang Mian". I have a few different types of noodles in my pantry, but decided to use Soba noodles instead. It turned out pretty yummy, and definitely refreshing. I will definitely make this again. Here's the recipe.


COLD SPICY SOBA NOODLES RECIPE
*Serves 2-3

Ingredients

  • 2 Bundle Soba Noodles
  • 1 Tbsp (Low Sodium) Soy Sauce
  • 1 Tbsp (Lee Kum Kee) Chili Bean Sauce
  • 1 Tbsp (Chin Kiang) Black Vinegar
  • 1 Tbsp Sesame Oil
  • 2 Tsp Sweet Soy Sauce (Kicap Manis)
  • 1 Stalk Green Onion, Chopped
  • 1 Handful Cilantro, Chopped
  • 1/2  Tbsp Raw Skinless Peanuts
  • 1/2 Tsp Toasted Sesame Seeds
Method

Cook the soba noodles per the instruction on the package. Once noodles are cooked, run cold water through the noodle to stop the cooking and to cool down the noodle. Drain and set cooled noodles aside. 

In a pan, dry roast (no oil needed) the peanuts over medium heat until golden brown. Stir peanuts occasionally so that they so not burn. Once peanuts are toasted, set aside, let cool and give them a rough chop. Mix all the liquid ingredients in a bowl to make the sauce and set aside. 

Divide the noodles into 2-3 bowls. Drizzle the sauce onto the noodles. Sprinkle each bowl with the green onion, cilantro, chopped peanuts and sesame seeds. Serve immediately. Enjoy!


June's notes:  Like me, you can definitely use any noodles of your choice. I think even linguini or ramen noodles will work fine! =) 

Simply June 

Thursday, August 29, 2013

Citrus Salad

I pinned this refreshing citrus salad a while back but never gotten a chance to try it. The addition of lemongrass in the syrup was very intriguing that I just had to try when I have the chance! So, with some girl friends coming over for lunch, it was a great time to attempt this recipe and see how they like it. A nice cool refreshing salad would be a perfect dish for a hot summer day. The verdict........everyone asked for the recipe.. Score! Even my friend who I just found out do not like grapefruit enjoyed the dish and requested for the recipe. 

I made very little tweak to the recipe overall. The recipe was pretty simple, although segmenting the citruses was a little messy. If you do not know how to segment a citrus, check out this video. Click HERE for the original recipe. The colors of my citrus salad (I blame the ruby grapefruit which wasn't that ruby/pink looking) wasn't as gorgeous as the one posted by the originator of the recipe but rest assured, it's still yummy! =) Here's my tweaked version of the citrus salad. You can also serve this as a dessert....I would! 


CITRUS SALAD RECIPE
*Serves 3-4

Ingredients
  • 1 Ruby Grapefruit, Segmented, Juice Reserved
  • 1 Regular Grapefruit, Segmented, Juice Reserved
  • 2 Naval Oranges, Segmented, Juice Reserved
  • 1 Tangelo, Segmented, Juice Reserved
  • 1/2 Cup Honey
  • 2 Tbsp Sugar
  • 2 Stalks Lemongrass, White part only, Cut into 1" pieces
  • 1/2 Vanilla Bean, Split & Scraped
  • Zest of 1/2 Lemon
  • Zest of 1 Lime
  • Mint Leaves for Garnish
Method
Mix the citrus segments in a bow to combine. Cover and chill. In a small saucepan, mix 1 Cup reserved citrus juice with honey, sugar, lemon zest and vanilla pod and seeds. Bring to a boil, stirring occasionally until honey and sugar is dissolved. Remove from heat and let stand 30 minutes. Strain and set aside to let it chill. 

Divide citrus segments into 4 serving cups. Drizzle about 1-2 tbsp of the syrup and garnish with lime zest and mint leaves. Let the salad chill until ready to serve. Enjoy! 


June's Notes: I used about 1/4 tsp of vanilla bean powder since that was what I had. If you do not have vanilla pods, feel free to use about 1/4 tsp of vanilla extract in the mixture. There will be plenty of leftover syrup which you can use for cocktails, drinks or more citrus salad!

Simply June 

Sunday, June 2, 2013

A Surprise Baby Shower

A couple months ago, a few friends and I got involved in planning a surprise baby shower for our S. T and I was in charge of the dessert station, games and some deco. Both of us were semi clueless but we were very excited to be involved in this surprise. After weeks of hard work, secret meetings, decoys, white lies, etc ( you name it) we successfully pulled off a surprise baby shower for S. Boy were we glad to be able to stop lying to our friend!! =). Our friends who graciously let us use their property (and who also co-hosted the baby shower) did a wonderful job with the table settings, food, drinks and decorations!


I'm very proud of this dessert table that we put together! I think the diaper cake makes a very nice center piece (though it's the only thing which was not edible!!)


The diaper cake center piece, made from diapers, faux gerbera daisies, ribbons and of course a handy dandy glue gun.


We spent a couple hours making party favors; Chocolate covered Pretzel sticks. The "chocolate" here is Wilton's Candy Melts. We filled each bag with 4 pretzel sticks, and tie a homemade thank you tag to it. Each guest takes one at the end of the party.


We also created a little baby prediction tree with prediction cards for each guest to fill and guess the baby's arrival date, time, length,weight, etc.


For desserts; 3 types so that everyone can hopefully find at least one that they like. A very rich Black Magic Chocolate Cake with cream cheese frosting which was a big hit with the guests. A tangy refreshing Lemon Bar and a light and yummy Eclair. We used the choux pastry recipe from my profiterole recipe, filled it with Jello Vanilla Pudding (from the box - mix per instructions) which is now my favorite go to for a pastry cream substitute, and a dark velvety chocolate glaze.


I did a mini (Black Magic) cake which unfortunately this is not my best work but was a great hit. The mini cake was fudge like, while the cupcakes was light. The texture is so different that it's hard to believe they are of the same recipe!


Now that we have some experience planning a baby shower, we're ready for more parties!

PS: We got most of our ideas from my Pinterest board!

Simply June 

Thursday, May 23, 2013

Berry Pavlova

I've always heard about Pavlova and seen beautiful pictures of this dessert but have never gotten a chance to try it out. Pavlova is basically a meringue with a crisp crust on the outside and is pillowy soft inside. It's often topped with whipped cream and fruits.

According to wikipedia, Pavlova is named after Anna Pavlova, a Russian ballerina. Although the dessert has a Russian name, it is believed to have originated from New Zealand (or Australia) when the ballerina was there during or after one of her tours to those countries in the 1920s. The dessert is apparently a popular dish and is frequently served during celebratory and holiday meals in New Zealand and Australia.

With some egg whites sitting in my fridge, I was contemplating between making friand, french macaron  or pavlova. I decided to go with Pavlova coz it seemed to be the easiest to make and I have some fresh berries at home that I can incorporate to the dessert. Plus, I'm always curious about this dessert.

I googled for a recipe and went with one I found on Allrecipes.com making slight changes. As I fear that the dessert will be too sweet, I reduced the sugar a little. The outcome was perfect, not overly sweet and light. The meringue is indeed crisp on the outside and soft in the inside. The berries paired nicely and they added some freshness to the dessert.  This is a dessert you could definitely eat more without feeling too guilty! I brought the dessert over to my neighbor's for dinner and I think they loved it! =)  Berries are in season now and this make a perfect summery dessert!

Here's the recipe with my changes. Note to self, hull the strawberries next time =)!


BERRY PAVLOVA RECIPE
*Serves 8-10

Ingredients
  • 4 oz Egg White (About 4 Large egg whites)
  • 1 Cup Granulated Sugar
  • 1 Tsp Vanilla Extract
  • 1 Tsp Lemon Juice
  • 2 Tsp Corn Flour
  • 1 Cup Heavy Cream (Add 1/2 Cup - 1 Cup more if you want more cream)
  • 1/2 Cup - 3/4 Cup Blueberries
  • 8-10 Oz Strawberries, Halved
Method
Preheat oven to 300F. Line a baking sheet with parchment paper. Draw a 9" circle on the parchment paper.

In a large bowl, beat egg whites until stiff but not dry. Gradually add in sugar, about 1 tbsp at a time, beating well after each addition. Beat until egg white is thick and glossy. Gently fold in vanilla extract, lemon juice and corn flour. 

Spoon mixture inside the circle drawn on the parchment paper.Working from the center and spread mixture toward the outside edge, making a slight indentation in the middle and building the edge. Bake for 1 hour then cool on a wire rack. **See Note**

In a small bowl, beat heavy cream until stiff peaks form and set aside. Place the meringue on a flat serving plate. Fill the center of the meringue with whipped cream and then top it with the berries.

June's Notes: Sugar needs to be incorporated well into the meringue if not your meringue will "weep" when it bakes if the sugar is not entirely dissolved prior to baking. 

I made 2 smaller meringue instead of one big one. I placed both meringue on the same baking sheet, making them about 5 inches in diameter each with about 2-3 inches gap between the two. The pavlova will spread a little once it bakes. Since my meringue is slightly smaller, I baked it for about 50 minutes instead. 

A lot of the other recipes I saw asked for the meringue to cool down in the oven with the oven door ajar after it has baked. I read that by letting the meringue cool slowly in the oven as opposed to letting it cool at room temperature helps so that the meringue does not deflate too much.  As my meringue cooled down, the center deflated a little and created a little crater. I thought it was perfect as I could fill the "bowl" with whipped cream and fruits.  I don't know if the pavlova is supposed to deflate and crack at all once cooled or it should retain its shape right after baking.  Maybe next time, I'll cool it in the oven and compare the results.  If you're not a big fan of strawberries and/or blueberries, feel free to top it off with raspberries, kiwi, peaches, etc. 

 If you're a Pavlova connoisseur, tell me....what's a perfect Pavlova like??


Enjoy!

Simply June 

Monday, May 20, 2013

Dorayaki (Japanese Pancake with Red Bean Paste Filling)

One of my favorite Japanese desserts/cake is Dorayaki. It looks like 2 silver dollar pancakes filled with sweetened red bean paste in the middle. The pancake is slightly sweet and a little more dense than the regular western pancakes. This pancake is great for dessert or for breakfast and can be very portable! 

I made a healthier version of dorayaki a few years ago. Although it tasted pretty good, this recipe that I'm sharing with you today will taste more authentic! It takes quite a bit of patience to cook this pancake so that the color is nice and even. When making this, I also realized that the pan used is very important to achieve the perfect texture and color. I think it has something to do with the heat distribution of the pan. I made the dorayakis using a crepe pan from Crate and Barrel and they turned out perfect. The color was nice and even, and the pancakes developed bubbles as they cooked (see below) which  made them slightly lighter. Upon tasting the dorayaki I made, my neighbor asked me to show her how to make it. This time, we used 2 pans to cook the dorayaki in hopes that we can finish making this quicker. Little did we know a difference in the pan used will give us different results in the dorayaki. The ones I made using the crepe pan turned out perfect. The ones my neighbor made using a regular non-stick pan was a little dense, no bubbles developed when the pancakes were cooking and the color was not as even. We eventually used my crepe pan to finish the rest of the batter and it came out perfect! 

Anyway, I turned to my now favorite Japanese food blog for a dorayaki recipe and loved the end product. It was overall quite easy to make these yummy Japanese desserts. I made my dorayakis just a tad smaller so that I can make a little more dorayakis! =) Nami's blog is excellent with step by step instructions on making dorayaki. Here's the recipe extracted from Nami's blog. 


 DORAYAKI RECIPE
*Makes about 14 (2-1/2") dorayakis

Ingredients
  • 4 Large Eggs
  • 2/3 Cup Sugar (OK to reduce to 1/2 Cup)
  • 2 Tbsp Honey
  • 1 Cup All Purpose Flour
  • 1 Tsp Baking Powder
  • 1-2 Tbsp Water
  • 1 Can/Package Sweetened Red Bean Paste (You will have some leftovers)

Method
In a large bowl, combine eggs, sugar and honey. Whisk well until mixture has a lot of bubbles and is fluffy. Sift flour and baking powder into the egg mixture and mix well. Let the mixture rest in the refrigerator for about 15 minutes. 

Stir in 1/2 tbsp of water at a time to get the right consistency. The batter should be slightly thicker than regular pancake batter. If batter is too thin, dorayaki will be too flat and not fluffy. 

Heat a large non stick frying pan (in my case, crepe pan works perfectly!) over medium low to medium heat. Dip a piece of paper towel in oil and rub the bottom of the pan with oil. The pan should be slightly oiled but shouldn't be visible. Scoop the batter with a table spoon (for a smaller dorayaki) and drop the batter from about 1" above the pan to create a 2" diameter pancake (batter will continue to slightly spread). When you see the surface of batter starts to bubble, flip over and cook the other side just till it's slightly browned. Transfer to a plate and cover up with damp towel to prevent from drying. Repeat until all batter has been used up.

Before assembling, roughly pair 2 pancakes together to ensure they "match" properly. The nicer/more even surface will be the outer layer. Scoop a heaping teaspoon of red bean paste and place it in the center of the one the pancakes. Slightly spread the red bean paste to the side, but ensuring the center is slightly higher. Sandwich with another piece of pancake, gently pieces together. Wrap each assembled dorayaki with saran wrap until ready to serve.

Serve the dorayaki with some green tea or coffee. It's great for an afternoon pick me up!

June's Notes: I ended up adding 1 tbsp of water to the batter to slightly dilute it. Oiling the pan is very important. You need to ensure that no oil is visible as this is the trick to get a nice and even color on the pancake. I also noticed that the first batch after oiling the pan will usually turn out a little ugly; though still edible. The heat is also important, too high heat you'll get a burnt (and slightly under cooked) dorayaki. Too low, the dorayaki might not develop bubbles that it needs. It literally made about 3-4 bad pancakes to learn from my mistakes and yield perfect ones after. So, don't be discourage if you had some bad pancakes in the beginning! 

Amount of red bean paste to fill is up to your personal preference. Fill more (without it spilling out from the sides) if you like more, less if not..If you're not a fan of sweet red beans (though I think you're missing out!!), fill it with some peanut butter or perhaps nutella! 

Since these dorayaki does not have any preservatives, I wouldn't keep this for more than 3 days. The husband and I had no problems finishing the dorayakis in 2 days... They are so good and convenient to eat! 


Enjoy!

Simply June 

Sunday, May 19, 2013

Easy Grilled Pork Chop

With my new purchase of a grill pan from Amazon.com, I knew I needed to find a recipe so that I have an excuse to try my new toy. The picture is not the greatest, but the piece of meat was delicious. Lesson learnt, use a boneless piece of meat next time. I only had bone-in pork chops in my freezer and was lazy to get a boneless one from the store. It was definitely a bad idea coz it took a long time to cook the meat.

The recipe called for cumin in the marinate and as much as I like cumin, I at a first glance of the recipe thought it might taste funky. However, the reviews were great....so I decided to go with the recipe anyway. To my surprise, the pork chop was delicious. The cumin was not very overpowering and all the seasoning was just right! I think the apple cider in the recipe helps to tenderize the meat too. 

Here's the recipe with my slight changes. Original recipe by Sunny Anderson can be found HERE.


EASY GRILLED PORK CHOPS RECIPE
*Serves 2

Ingredients
  • 2 Boneless (1/2" Thick) Pork Chops
  • 2 Tbsp Honey
  • 1 Tbsp Olive Oil
  • 2 Tsp Apple Cider Vinegar
  • 1 Tsp Ground Cumin
  • 1/8 Tsp Cayenne Powder
  • 1/4 Tsp Onion Powder
  • Pinch of Salt
  • Freshly Ground Black Pepper
Method
Combine all the ingredients in a resealable zip lock bag (large enough to fit the pork chops). Add in pork chops into the marinade, seal and give it a quick rub/massage. Let it rest in the fridge for at least 1 hour.

Heat a grill pan (or a grill) over medium heat. Remove the pork chops from the bag and slightly sprinkle with salt and pepper. Place on the grill and cook the pork chops until they release from the grill (about 4 minutes). Flip and cook on the other side for another 3 minutes. Once the pork chops are cooked through, remove and serve with optional grilled vegetables of your choice of sides.

June's Notes: I sliced up some zucchini and par boiled some mini potatoes, tossed them in a bit of olive oil and a pinch of salt & pepper to taste and cook them on the grill pan since I have some room on the side.

Enjoy!

Simply June 

Saturday, May 18, 2013

Quick Pickle Japanese Cucumber Salad

I'm not sure if this dish is of Japanese or Korean origin. I first had this salad at a sushi restaurant and it was delicious. When I was searching for a recipe to replicate the dish I had, I came across this recipe HERE which called it Korean cucumber salad.

Since I first tasted this at a Japanese restaurant, and I'm slightly tweaking the recipe I found on Koreanfood.com, I'm going to just call it (Quick Pickle) Japanese Cucumber Salad. I hope you will enjoy this quick pickle cucumber salad as much as I do. Here's the super easy recipe with my slight changes.


JAPANESE CUCUMBER SALAD RECIPE
*Serves 3-4

Ingredients
  • 4-5 Persian Cucumbers
  • 3 Tbsp Sugar
  • About 1 Tbsp Salt 
  • 1/4 Cup White Vinegar
  • 1/4 Tsp - 1/2 Tsp Toasted Sesame Seeds
Method
Thinly slice cucumbers (skin on) with a mandoline (watch those fingers!) and place in a glass or porcelain bowl. Sprinkle cucumber slices with salt and sugar and gently toss to combine. Add vinegar and stir to coat all the cucumber slices. Cover and refrigerate the cucumbers for about 30 minutes. Sprinkle with sesame seed before serving.

June's Notes: You can let the cucumbers marinate 2-3 hours before serving. You can also let it sit overnight, although I think the crunchiness is slightly lost due to the long pickling. Do not keep the cucumbers more than 24 hours as it's no longer as tasty. =)

Don't worry if it looks like there's not enough liquid in the pickling. The cucumber will release more liquid as it "marinates". If you can't find Persian cucumbers (which are smaller), English cucumbers are ok too. 1 English cucumber should suffice.

Enjoy!

Simply June 

Tuesday, May 14, 2013

Marmite Honey Wings

The husband and I love wings; fried, grilled, roasted, etc! With some pieces of wings in the freezer, I decided to make some wings for dinner. As I don't want to start up the grill or fill up a pot of oil just to cook a few pieces of chicken, I opted to just pan fry them over the stove.

I decided to use some marmite to marinate the wings. Growing up I remember eating marmite in congee but never really had it as a sauce in a dish.  Marmite is a yeast extract, by product of making beer. It's dark, syrupy, salty and does have a slight bitter taste too. Not everyone like it distinct (and weird?) taste. Since I grew up with it, I was fine with the taste.  In the US, you can usually find it in the British Food aisle and it'll cost about $6-8 for a small jar.

In this recipe, I added some sweet and tangy elements to slightly mask the strong flavor of marmite. Here's the recipe! I bet it will be as tasty if cooked over charcoal grill as well.


MARMITE HONEY WINGS
*Serves 3-4 

Ingredients
  • 12 Chicken Wing Segments
  • 1 Tbsp Marmite
  • 2 Tbsp Honey
  • 1 Tbsp Ketchup
  • 1 Tbsp Oyster Sauce
  • Freshly Cracked Black Pepper to taste
  • 2 Tsp Oil 
  • 2 Tbsp Water
  • 1/4 Tsp Toasted Sesame Seeds (Optional)
Method
Mix marmite, honey, ketchup and oyster sauce in a bowl. Add chicken wings and marinate for about 1 hour. 

Heat a frying pan with 2 tsp of oil over medium heat. Add marinated chicken (do not pour in the marinade juice) into the pan, season with fresh cracked black pepper and fry each side for about 1-2 minutes until you get a nice caramelization on the skin. 

Then add all the marinade juice and 2 tbsp of water into the pan and lower heat to medium low. Cover and let the wings cook for about 25-30 minutes turning them 1-2 times. Once the wings are cooked through and the sauce has thickened, transfer to a serving plate. Sprinkle with optional sesame seeds and serve immediately with or without warm rice.

Enjoy!

Simply June 

Monday, May 13, 2013

Korean Seasoned Spinach Banchan / Sigumchi Namul

With a little Korean bbq party planned at our patio, we needed to shop for some meat to cook and some banchan (Korean side dish) to accompany all that meat. I knew I needed a variety of spicy and non spicy banchan and decided to make some non spicy one myself. That way, we can control what goes into the dish and yes, save a bit of money while at it.

I had recalled eating a spinach side dish (Sigumchi Namul) at Korean restaurants and loving it. I also vaguely remember my mom saying it's quite easy to make. I think! After searching for different versions recipe, I decided to roughly do it my way, without garlic and green onion like some recipes required. I don't know if it's as authentic anymore, but it's surely is delicious and healthy! This dish can be eaten immediately or kept for a couple days. I made this a day ahead so that the spinach can absorb as much flavor as possible and so that I don't have too much things to do the day of the bbq. Here's the recipe!


KOREAN SEASONED SPINACH SIDE DISH RECIPE
*Serves 4-6

Ingredients
  • 2 Bunches Spinach (About 1-1/2 lbs total)
  • 1-1/2 Tbsp Soy Sauce (Low Sodium)
  • 3 Tsp Sesame Seed Oil
  • 1 Tsp Toasted Sesame Seeds
Method
Trim the ends of the spinach, remove any wilted leaves and then wash the spinach thoroughly. Prepare an ice bath; a bowl of water with a lot of ice. Boil a large pot of water (large enough to fit the spinach) over high heat. 

Once the water is boiling, blanch the spinach for about 30 seconds. Then, quickly remove and place in the ice bath immediately to stop the cooking and cool the spinach. This will also help retain the beautiful green. Drain and squeeze it gently to remove as much water as possible.

Cut the spinach a few times and set it in a bowl. Add soy sauce, sesame oil and sesame seeds. Using a chopstick, toss and mix well. Transfer onto a serving plate and serve immediately with some rice and your favorite meat dish. Alternatively, keep it covered and refrigerated (you can keep up to 3 days) until ready to consume.

June's Notes: You can definitely add more soy sauce and sesame seed oil to your preference. Start with the amount in the recipe first, taste then add more if you want a little more salt in your dish. 

Enjoy!

Simply June 

Thursday, May 2, 2013

Salmon Teriyaki

I recently stumbled upon this lovely Japanese cooking blog and have since fell in love with it. The recipes posted are easy and the dished come out delicious! I have since tried a few other Japanese recipes from her blog with delicious results.

With a piece of salmon I got on sale, I decided to cook up some teriyaki salmon for the husband and I. Right away, I knew I had to look up Nami's blog: Just One Cook Book for this dish and was delighted to see that she has a recipe for it. I had most of the ingredients in the pantry and was able to make salmon teriyaki as planned.

Unfortunately, I did not have sake in my pantry but was able to use dry sherry as a substitute. I cut my piece of salmon fillet to larger pieces than what the recipe asked for; so cooking time was slightly longer. Result was a very delicious piece of teriyaki salmon; one each for the husband and I and extra for my neighbor. We served the salmon teriyaki with some steam rice with furikake and clam miso soup. Dinner that day was super yums!

Here's the recipe adapted from Nami's blog. The instructions on her blog are clear with step by step pictures.


SALMON TERIYAKI RECIPE
*Serves 2

Ingredients

  • 2 Salmon Fillets, Skin On (About 3/4" thick - the skin will hold the flesh together when cooking)
  • Salt
  • Freshly Ground Black pepper
  • 1 Tbsp All Purpose Flour
  • 1/2 Tbsp Olive Oil
  • 1 Tbsp Butter
  • 1 Tbsp Dry Sherry ( or Sake)
  • 1/4 Tsp Toasted Sesame Seed (Optional)
  • 1 Tbsp Chopped Green Onion (Optional)
Sauce Ingredients
  • 1 Tbsp Dry Sherry ( or Sake)
  • 1 Tbsp Mirin (or 1 Tbsp Sake + 1 Tsp Sugar)
  • 1 Tbsp Sugar
  • 2 Tbsp Soy Sauce 
Method

Combine the sauce ingredients and mix well until sugar is mostly dissolved. 

Rinse salmon and pat dry with paper towel. Season both sides of the salmon with salt and black pepper. Then sprinkle 1/2 tbsp of flour on one side of the salmon and spread evenly. Flip over and do the same to the other side. Gently remove the excess flour. 

In a frying pan, heat olive oil and butter over medium heat. Do not burn butter and if the pan gets too hot, reduce heat or remove from heat temporarily. Add salmon fillets, skin side down and cook the salmon for about 3 minutes or until the skin is nicely browned and crisp. 

Add dry sherry and cover with lid. Steam the salmon for 3 minutes or until it's cooked through. Transfer the salmon to a plate. Then, add sauce ingredients to the pan and heat it up. When the sauce starts to boil, add salmon back in the pan and spoon sauce over the salmon. When the sauce thickens, turn off the heat. Transfer salmon and sauce onto a serving plate. Sprinkle with optional sesame seeds and green onions and serve immediately with some warm rice.

June's Notes: As the piece of salmon I used was big, I seared both sides of the fish (starting with the skin side first) for a couple minutes to ensure it's cooked through. 


Enjoy!

Simply June 

Thursday, March 28, 2013

Madeleines

Madeleines are small cookies/cakes baked in a shape of a shell and originates from France. I've not been to France but have tasted Madeleines from various stores in the US. They are lovely cakes and goes well with tea or coffee. Not overly sweet, petite enough for me to indulge and not feel guilty.

I've been wanting to try my hands to bake Madeleines and finally got a chance when I bought a Madeleine cookie pan from TJ Maxx. After googling for a recipe, I went with the one I found on www.food.com. I didn't make any changes to the recipe and loved the result. I brought them to some very well traveled friends, and they commented that while the ones I made were very good and that they liked the texture, the ones in France are slightly fluffier than mine. Good to know, I will try to lighten it up the next time and see how they turn out. Till then, here's the Madeleine recipe:


MADELEINE RECIPE
*Makes 18-20 Madeleines

Ingredients

  • 2 Large Eggs
  • 2/3 Cup Sugar
  • 1 Tsp Vanilla Extract
  • 1/2 Tsp Grated Lemon Peel
  • 1 Pinch Salt
  • 1 Cup All-Purpose Flour
  • 10 Tbsp Unsalted Butter, Melted and Slightly Cooled
  • Powdered Sugar (Optional)
  • Extra Butter and Flour for greasing pan
Method
Preheat oven to 375F. Generously butter and flour pan for large madeleines (about 3 x 1-1/4 Inches). 

Using an electric mixer, beat eggs and sugar in a large bowl just to blend. Beat in vanilla, lemon peel and salt. Add flour, beat just until blended. Gradually add cooled melted butter in a steady stream, beating just until blended.

Spoon a little over 1 tbsp of batter into each indentation in pan (do not smoothen the batter). Bake until puffed and brown, about 12-15 minutes. Cool 5 minutes. Gently remove from pan. Repeat process, buttering and flouring pan before each batch. 

Dust cooled cookies with optional powdered sugar.

Enjoy with a cuppa tea or coffee! 

June's Notes: Depending on your oven and the kind of pan you use, the bake time will slightly differ. I needed to place my non-stick madeleine pan (darker pan) on the highest level in my electric oven, so that the madeleines do not burn. For the first batch, it took me about 14-15 minutes. Baking the second batch, with the leftover batter (did not fill all the cavity with batter) and reusing the pan, 12-13 minutes bake time were sufficient. Anything more, you'll get burnt cookies!

Simply June 

Wednesday, March 6, 2013

BAGNA CAUDA.........Love It!


We've been blessed to have friends from different parts of the world and generous to share their culture with us. Often, sharing their culture/tradition involves eating.... and the husband and I cannot say no to food! =)  A couple months ago, our Italian friends C&A invited us over for a traditional Italian meal; Bagna Cauda which originates from their town. According to C & A, their family always have it over winter and share the meal with family and friends. After I tried this delicious dip/meal, I was totally hooked!!

According to Wikipedia, Bagna Cauda is a warm dip typical of Piedmont, Italy and is served and consumed in a manner similar to fondue. The dip is made with garlic, anchovies, olive oil, butter and sometimes cream. Therefore, you must like fish or in this case anchovies to enjoy this dip. The dish is eaten by dipping raw, boiled or roasted vegetables and even bread. Traditional, the Bagna Cauda is placed in a big pan in the center of the table for communal sharing. Now, it is usually served in individual pots.

C & A was generous to haul 2 (or 3) large cans of anchovies back from Italy during their last trip. It took them several days to clean the salt cured anchovies and prepare some of the vegetables for dipping. We were greeted with a melange of steamed, boiled, and raw vegetables (raw beets, boiled cabbage, boiled potatoes, raw radish, steamed cauliflower, steamed asparagus, raw fennel, steamed carrots, boiled mini onions, etc) C prepared the quick yet delicious anchovy dip in front of us, so I had a first hand look of how it's being made. Super easy, just make sure you have some canned anchovies at home. Since I could not find salt cured anchovies, I used anchovies soaked in oil instead. The result is still as good.  It's definitely a good way to load up on a lot of vegetables. Some vegetables was surely an excellent match for the dip, some was just ok... but overall it's a personal preference thing as there's no one vegetable that I dislike after dipping it in the bagna cauda! Here's the recipe!


BAGNA CAUDA RECIPE
*Serves 1-2

Ingredients
  • 1 Small (2 Oz) Can Anchovies (in oil), Drained
  • 3 Tbsp Olive Oil
  • 4-5 Cloves Garlic, Grated
  • 2 Tbsp Heavy Cream
  • Dash of Ground Black Pepper, Optional
Method
In a small pot, heat oil over medium heat. Then, add grated garlic and anchovies and let the mixture cook over medium low heat until the anchovies melt. Stir occasionally to help melt the anchovies. Finally, add in heavy cream and let the mixture warm up. Transfer bagna cauda to a small porcelain bowl and add some fresh cracked black pepper. Serve the warm dip with your favorite steamed or raw vegetables. Bread also goes well with this dip.

June's Notes: With the bagna cauda sauce I made, I decided to steam some asparagus till slightly tender and poached and egg. I poured about 2 tbsp of the bagna cause sauce over the asparagus and poached egg platter and loved the combination of the runny yolks and the bagna cauda sauce! 


To learn how to poach an egg, check out Alton Brown's tips

Simply June 

Monday, February 18, 2013

Woo Tau Kau Yoke (Steamed Pork Belly & Taro)

Stocked with some taro and a piece of pork belly at home, I knew I had to attempt to make "Woo Tau Kau Yoke" (Steamed Pork Belly & Taro). I've had this dish a couple times and remembered mom making it at home too many years ago. It seems like a dish that requires quite a few different steps to achieve the final delicious dish.

I never knew that this is a Hakka dish until after some googling around, I realized that references were made that this dish is of Hakka origin. Anyway,  I decided to use Lily Wai Sek Hong's recipe for the "Woo Tau Kau Yoke" with minor changes. The verdict  - the dish was delicious... tasted almost like how my mom used to make it! Yums! Lily used a pressure cooker to steam the pork; I used the good old steamer and it worked out just great! Here's the recipe of the "Woo Tau Kau Yoke" with my changes:


WOO TAU KAU YOKE (STEAMED PORK BELLY & TARO) RECIPE
*Serves 2-3

Ingredients (A)
  • 1/2 lb Pork Belly 
  • 1/2 lb Taro (Cut to the size of the pork belly slab, and cut 7-8 slices)
  • 1 Tsp Dark Soy Sauce
  • 1/4 Tsp 5 Spice Powder
  • 2 Tbsp Corn Flour
  • Oil for deep frying
Sauce Ingredients (B)
  • 2 Shallots, Peeled and Minced
  • 2 Garlic Cloves, Peeled and Minced
  • 1/2 Tbsp Sugar
  • 2 Tsp Oyster Sauce
  • 1 Tbsp Light Soy Sauce
  • 1-1/2 Cube of Fermented Red Bean Curd (Nam Yue)
  • 1 Tbsp Cooking Oil
  • 2 Tsp Sesame Oil
  • 1-1/2 Cup Water
  • Slurry Mixture (Mixture of 2 Tsp Corn Flour  & 2 Tsp Water)
Method
Boil a pot of water (enough to submerge pork belly). Clean pork belly and par boil the pork for about 10 minutes. In a bowl, mix together dark soy sauce and 5 spice powder from Ingredients A. Remove the boiled pork belly and place in the soy sauce mixture. Coat the pork in the mixture and set aside.

Heat enough oil (medium heat) for deep frying and deep fry taro pieces until slightly golden. Remove and place on paper towel to drain access oil. Then, deep fry pork belly (skin side down) for about 7-8 minutes. Remove and soak pork belly for about 15 minutes in cold water to wash oil oil and regain moisture lost in deep frying. Then remove the pork, pat dry and slice pork into 1/2 inch pieces. 

Place 2 tbsp of corn flour in a bowl, and lightly toss the fried taro in some corn flour; ensuring both sides are coated. Remove the taro pieces and set aside and repeat with the sliced pork belly. Then using a deep dish/bowl, arrange the pork & taro slices, alternating each piece. Ensure that they are packed snuggly in the dish. Set aside. 

Heat wok with 1 Tbsp of oil. Add shallots, garlic and sauté until they are slightly brown. Add in Nam Yue and the rest of the sauce ingredients (B) except the slurry mixture. Let the mixture come to a boil, then stir in the slurry mixture and let the sauce thicken. Pour sauce over the assembled pork and taro dish. 

Cover the dish with aluminum foil and place in a steamer or a pot to let the pork and taro steam (over medium heat) for about 1-1/2 to 2 hours; until pork and taro are tender. Remember to check the water level of the steamer occasionally and add more hot water if needed. Carefully removed the steamed dish, place a serving platter over it and invert the dish. Be very careful as the dish is hot! Serve immediately with some warm rice.


June's Notes: Alternatively, instead of preparing the pork belly yourself.....save the work and buy a piece of Roasted Pork Belly (Siew Yoke) and cut them to size for this dish! It will taste equally the same, if not better!

I had to go through a couple different bowls to find one the fits perfect so that I can fit the pork and yam snuggly. I ended up arranging the pork and yam in my korean clay pot, covered it with foil and then the clay pot cover before steaming. 

Enjoy!

I am submitting this post to Chinese New Year Delights 2013

Simply June